Give colour depth
Fine pencil marks accumulate colour gradually, making tonal turns and soft transitions easier to observe.
ART SPECIALIST / COLOURED-PENCIL
Explore gradients and texture with thin layered colour and pressure control, turning light and shade into subtle colour shifts to complete the subject gradually.
Build light and colour gradually through fine layers.
LEARN · PRACTISE · CREATE
Begin with pressure, swatches and reserved highlights. Practise light layering, directional hatching and warm–cool comparison, then turn observed value and texture into a layered coloured-pencil image while refining composition, detail and your own palette for the subject.
Fine pencil marks accumulate colour gradually, making tonal turns and soft transitions easier to observe.
Compare warm and cool notes, emphasis and open paper so everyday objects, portraits or imagined subjects can carry their own colour voice.
Starting lightly, testing colour and then deepening it preserves more room to adjust than pressing hard at once.
Start with light pressure, see how paper tooth holds colour, and deepen gradually without flattening the surface too soon.
Use small swatches to compare variations within a hue and their values before establishing the subject’s broad colour statement.
Build related and contrasting colours in transparent light layers to practise natural gradation and colour depth.
Let strokes follow petals, fur or an object’s turn so marks reinforce form and direction.
Identify highlights that paper white can express, protect the key light areas, then build colour around them.
Use spacing, direction and value for fruit skin, fabric or fur so detail serves the whole image.
Find value, warm–cool relationships and highlight placement in the reference, then use small swatches to set the lesson focus.
See light pressure, layering or directional hatching demonstrated; complete a small area first before approaching the larger image.
Begin with pale colour and large shapes, add tone and texture layer by layer, and pause to compare and revise when needed.
Compare the first drawing with later layers and note effective colours, pressure choices and a direction to continue next time.
The following is a reference learning pathway, not a fixed five-lesson package. Subjects, difficulty and the number of lessons for each stage are adjusted to your starting point, goals and progress.
| Stage | Practice | What to review |
|---|---|---|
| Reference 01 / Pressure and swatches | Practise light pressure, value scales from pale to deep, and small swatches using a limited palette. | Is the paper tooth still usable? Are the value steps and colour differences clear? |
| Reference 02 / Basic form and reserved paper | Use fruit, leaves or simple objects to observe broad form, value and highlights kept as paper white. | Were shape and proportion addressed before detail? Have highlight areas been covered too early? |
| Reference 03 / Layers and gradation | Layer related and warm–cool colours lightly to practise smooth gradation and turns of form. | Do the layers move from light to dark? Do colour transitions retain a sense of air? |
| Reference 04 / Texture and direction | Follow the direction of petals, fabric, fur or fruit skin while controlling hatch density and local darks. | Do the marks follow the form? Are details competing with the subject and its value structure? |
| Reference 05 / Developing a subject | Choose a suitable subject and develop a themed image from sketch and swatches through layered work that may continue across lessons. | Continue according to individual progress; these five stages are reference points, not a fixed five-lesson plan or a promise of completion each lesson. |
Heavy pressure flattens paper tooth and limits later layers; establish value with light layers before deepening gradually.
Mark paper-white highlights before colouring and leave key light areas open, rather than covering them and struggling to restore brightness.
Test colour and begin with pale layers; add darks later for clearer control of warm–cool balance and overall value.
Paper, pencil type and whether tools are self-provided affect layering results, so please confirm the arrangement before enrolment.
The lesson flow is a reference; the 90 minutes include tidying or saving files. Work may continue across lessons, and completion in every lesson is not guaranteed. Confirm teaching resources, tools, software/devices, materials and any additional arrangements before booking; these are not assumed to be fully included in the fee.
COLOURED PENCIL / PROCESS
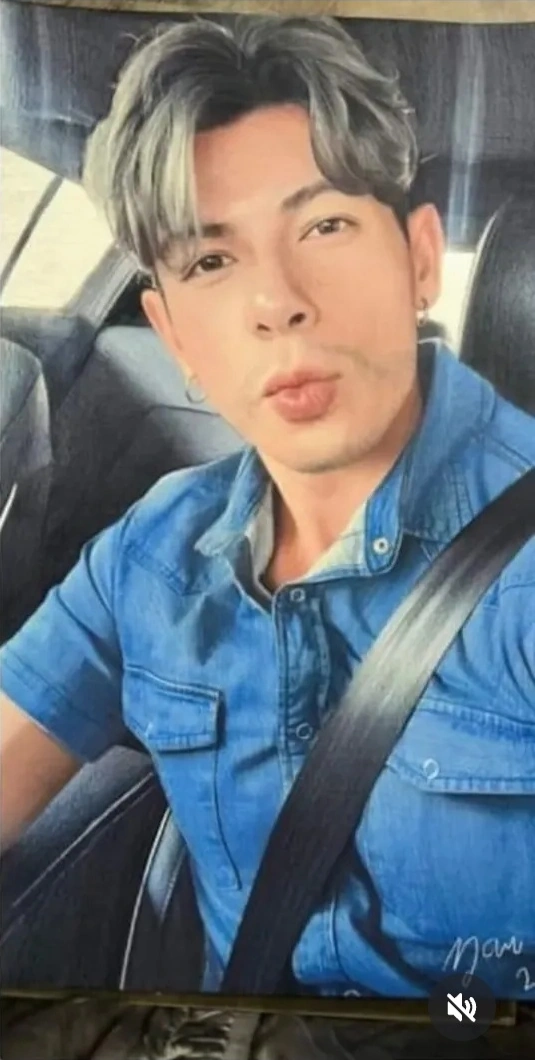
Use one drawing to study proportion, reserved white areas, skin tones, hair and clothing layers. The photo reference and each drawing stage are displayed separately; select an image to enlarge it.
First compare head direction, facial placement, the collar and seat-belt angle. This is a photo reference, not a finished coloured-pencil drawing.
Use light lines to place the features, hair, collar and seat belt, organising large shapes and reserving bright paper areas.
Observe facial light and shade and the direction of the hair, building colour in light layers. The unfinished clothing shows the relationship between details and the whole.
Connect skin tones, hair and blue clothing, paying attention to thin colour layers, folds and the different tones of the seat belt.
Compare the amount of detail in the face, hair and clothing. Blue clothing, highlights and the dark background establish the focus; the signature is retained as supplied.
Brand-supplied coloured-pencil work and process examples. The photograph is an observational reference, not a drawing. These are stages of one piece, not a fixed four-lesson package or a guarantee of completion in every lesson.
Original piano · ambient instrumental
Music is paused by default. Press Play Gentle Music to listen. The default volume is 8%; adjust it as you wish.
Choose whether to play. Pause or stop the music at any time.